
Price: $16.80
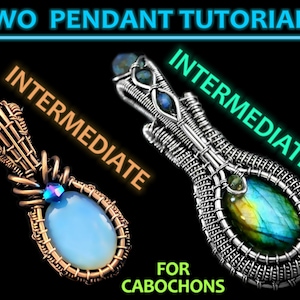
Beaded Borders Tutorial - wirework and silversmithing - wire layering, reticulation, prong setting - 2 designs described in detail
Star Seller
Star Sellers have an outstanding track record for providing a great customer experience—they consistently earned 5-star reviews, shipped orders on time, and replied quickly to any messages they received.
You can only make an offer when buying a single item
Star Seller. This seller consistently earned 5-star reviews, shipped on time, and replied quickly to any messages they received.
Instant Download
Your files will be available to download once payment is confirmed. Here's how.
Instant download items don’t accept returns, exchanges or cancellations. Please contact the seller about any problems with your order.
Etsy Purchase Protection: Shop confidently on Etsy knowing if something goes wrong with an order, we've got your back for all eligible purchases — see program terms

Related searches


1,521 reviews
5 out of 5 stars
Excellent tutorial, very well written, easy to follow, with many high quality photos and tons of tips and infos.
Heike Upmann Feb 23, 2019
Awsome, interesting tutorial...full of great tips and info.
Marcia Geving Nov 29, 2018
Photos from reviews
More from this shop


Disclaimer: Etsy assumes no responsibility for the accuracy, labeling, or content of sellers' listings and products. Electrical or electronic products may pose a risk of fire or electrocution. Vintage, handmade, refurbished, or modified electrical or electronic products may not meet current safety standards and may not be in safe working order. Inspect carefully before use and message the seller if you have concerns relating to the product. Do not use a vintage electrical or electronic item if its safety cannot be verified. To reduce the risk of fire, never leave vintage electrical or electronic products plugged in unattended. See Etsy's Terms of Use for more information.